Up until last year, I had a long-standing impression that automated visual testing was a difficult nut to crack. Simple screenshot comparison tools can be finicky, and doing it manually can take years off your life. Believe me, I know. It’s rough. Figuring out how to verify an app’s visual appearance can feel like being stuck between a rock and a hard place, with no easy answers in sight.
Well, hold on to your butts because I recently had a great experience with automated visual testing.
 Above: Arnold (played by Samuel L. Jackson) from the film Jurassic Park, by Universal Pictures
During a recent project, I had the pleasure of using Applitools to verify the visual appearance of a web app. It was actually pretty awesome. Applitools made it possible for us to automate our visual testing. It greatly reduced how long it took to run our tests. This allowed us to keep tabs our app’s appearance along the way and catch visual bugs soon after they were introduced.
I am writing this article to share a bit of my journey and give you a glimpse into what amazing things are possible with Applitools’ visual testing suite.
![]()
The Quest for “Right”
If you have ever developed a website or app with a UI, you probably know what it’s like to spend countless hours tweaking its appearance. This can involve adjusting the alignment of elements of the screen, the fonts, the colors, and how information is displayed. Naturally, you want it to look right. It’s probably your job to make sure it looks right.
But, how do we actually know that it is “right”?
Ad hoc Testing
The first technique we probably all start with, at least informally, is ad hoc testing. We navigate through our apps and look for things that feel “off”. It’s natural to do this, either as a part of developing an app, or as a basic way to “test” that our apps look right. Ad hoc testing is useful and definitely has its place, but it can only go so far.
For one thing, ad hoc testing can yield inconsistent results from day to day or person to person. One day, you might focus on a button’s odd appearance and miss an obvious alignment problem. Someone else might focus on an entirely different problem and miss both of those issues. It can be hit and miss, which is why it helps to involve more than one person.
Now, let’s not poo-poo ad hoc testing too much. Its lack of structure is actually a strength, because you can think outside the box with what you examine and try out. One limitation, though, is that it does not ensure full coverage of the app. That is simply not its purpose.
Adding a Manual Visual Test Script
Writing a manual visual test script is an important step into the world of consistent reproducible testing. Following a script will allow you to verify that every screen in your app matches the UI design. Also, your testing is now reproducible by more than one person. This will make sure that no matter who executes the test script, every screen will be evaluated. Can we now dust off our hands and say “our job is done”? Well, not quite.

As great as this is, there are some significant limitations with using manual test scripts. For one, manual testing can be a tedious, time consuming, and susceptible to human error. Also, it relies on the design sensibilities of the person executing the test. He or she has to compare the app to the design and evaluate if there are “meaningful” differences. One tester might be more picky or strict in his or her evaluation, while a different tester is more lenient. Two people may have very different opinions about what looks “close enough.” This can cause the test results to be influenced not only by the app’s adherence to the UI designs, but also the ability for the tester to correctly identify those differences. Even if you use a diff tool to help identify the differences, the outcome can still be affected by differences in opinion between different testers.
Another downside is that it can take a long time to execute such manual testing. It can be very, very tedious. I think we can agree that when something takes a long time to do, we probably will avoid doing that thing very often. Just think about filing your taxes. Shudder… Thank goodness we only have to do that once per year! A team would likely deprioritize such long and tedious testing in favor of more urgent work. Because of this, a team might go a long time between manual test executions, even waiting until just before release to execute the testing. I’ve totally been there.
The problem with this is that infrequent testing, or “end of the project only” testing, delays a team’s ability to find pesky visual design bugs until much later. This can cause an unfortunate surprise late in the project that requires rework, hitting at just the wrong time - when the project team is trying to get the app out the door.
Automated Testing With Applitools
I was the Lead Tester on a recent web app project. For version 1 of our app, I wrote a manual visual test script with many steps and pages to verify. Writing it all down in a document was the simplest thing to do, but it turned out to take a long time to get right. It also took a long time to execute! Our app needed to support four different browsers, so we had to execute the entire manual test script four times! It took me nearly an entire week to execute across all of our supported browsers. Ugh. For version 2 we knew that something had to change, and that’s when we starting looking at Applitools.

I got started with Applitools by poking around with Applitools’ classic test runner. It enabled me to write automated tests using Protractor that would navigate our app to a particular page or state, and then take a snapshot of it. The snapshot was sent up to Applitools’ web dashboard where I could view it and approve it. This created a “baseline” approved snapshot for that test. When I ran my test again, a new snapshot was taken and compared to the baseline. If Applitools Visual AI detected any differences, then it would highlight them in the web dashboard, allowing me to review the differences and accept or reject them. I could flag any issues that needed be fixed. It was awesome.
As a brief aside, I should point out that Applitools doesn’t just capture screenshot images, but also a page’s DOM and CSS. This helps Applitools’ Visual AI detect meaningful changes in the UI instead of flagging slight rendering inconsistencies. Its intelligent AI makes it possible to review a few meaningful changes without drowning in a sea of tiny unimportant differences. It eliminates the noise and gives you a few meaningful changes to review.
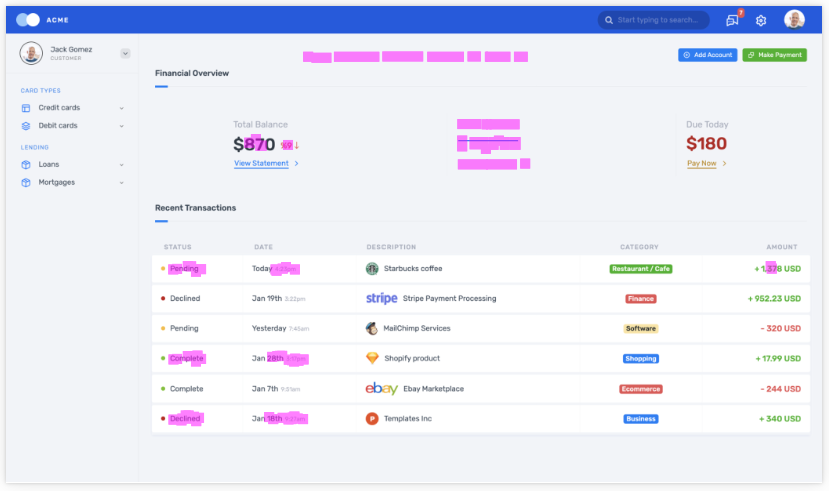 Applitools snapshot showing highlighted changes
Using the classic runner, I wrote NPM scripts to execute our visual tests on each web browser. To run the tests, I just ran each script one after the other - first for Chrome, then for Edge, then for IE, etc. This was much faster than testing manually. I could easily test all four browsers in a few hours, something that would take a few days to do manually.
Limitations of the IE WebDriver
Applitools classic runner is a great tool, and I wholeheartedly recommend that you check it out. That being said, I discovered some limitations that required me to upgrade to Applitools Ultrafast Grid. Most of the issues centered around limitations in IE’s WebDriver.
Oh IE… you relic of a different age… kept alive for reasons unknown to mortals. We have been cursed with supporting you.
When running my tests on IE, I discovered quirks that made it hard or impossible to capture full-page snapshots of our app. The problem was caused by a combination of our app’s implementation and inflexibilities in the IE WebDriver. It is possible the the issues have been fixed by now, but be aware: If you plan to support IE, then it would be worth evaluating Applitools’ IE support to ensure that it meets your needs.
Fortunately, IE is end of life on June 15, 2022, so you probably won’t need to worry about this.
These issues were mostly fixed when I upgraded to Applitools’ Ultrafast Grid, which I will describe below.
Browser Quirks
One challenge of testing on multiple browsers is that they all behave a little bit differently. For example, one of our tests involved mousing over elements on the page to display tooltips. We discovered that the WebDrivers varied in their coordinate systems. We couldn’t just say “move the mouse to (X,Y)” because the relative origin of each coordinate system was in a different location. Some browsers had (0,0) in the top-left of the page. For at least one browser, the origin was inexplicably at the top-left corner of the entire OS window. To be clear, this wasn’t a problem with Applitools. This was an inconsistency in the WebDrivers used by Protractor and likely present in the browsers themselves. To work around this, we had to adjust our coordinates with different offsets for each browser. This better ensured that the mouse movements ended up in the same place on the page for each browser. We spent a lot of time investigating and fiddling with offsets to get that right.
Browser and WebDriver quirks meant that we had to configure our tests a bit differently for each browser. Such tweaking took time to get right, but it was necessary so that our tests ran consistently. In retrospect, it would have saved us a lot of time if we had just used Applitools’ Ultrafast Grid from the beginning, but we were taking things one step at a time and hadn’t yet drawn that conclusion. Some lessons take a while to learn.
Taking it to the Next Level With Applitools Ultrafast Grid

When we finally upgraded to the Ultrafast Grid it was like a breath of fresh air combined with a kick of adrenaline. With it we were able to run our tests once on a single browser, but magically produce snapshots for multiple target browsers.
Yes, you read that right. Run once, and produce output for as many browsers as we wanted. It was total black magic, but it actually worked! You may be asking, “How do you know that the Ultrafast Grid outputted accurate renderings for each browser?” Well, I set aside a few days to evaluate the accuracy of the renderings and found them be either spot on or at least very close, depending on the browser. Everything was acceptably close enough, which I was very glad for.
Here’s a quick step-by-step of how the Ultrafast Grid works:
- Our Protractor tests launch our app, and navigate to a specific page or state.
- Our Protractor tests use the Applitools API to take a snapshot of the page.
- Applitools sends the snapshot to its cloud-based Ultrafast Grid.
- The Ultrafast Grid renders the snapshot on multiple target browsers.
- The snapshot for each browser shows up in the Applitools web dashboard, where any detected changes are highlighted.
- We review the snapshots and changes, and either accept or reject them. We can add comments for issues found.
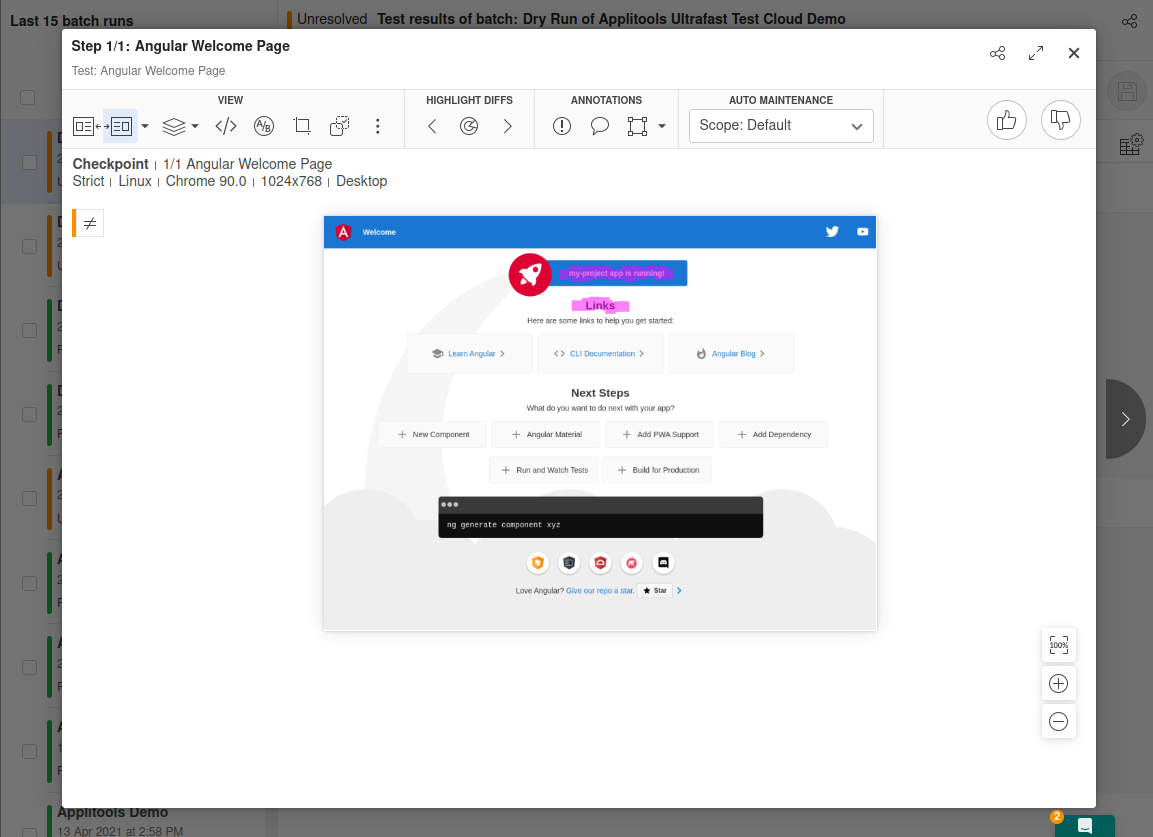 Looking at a snapshot in the Applitools web dashboard
The Ultrafast Grid saved my team a lot of time. It was a little sad when I had to delete the special browser handling code I had written, but ultimately the Ultrafast Grid was much easier to work with. It provided accurate screenshots and change detection for each of our target browsers. Also, and certainly not least, it was able to turn around test results much quicker than running tests separately on each browser. Whereas before it would take a few hours to run the tests, now it took only 30-40 minutes with the Ultrafast grid. I could conceivably run the tests once every day if I wanted to, or hook it into our CI pipeline. It was amazing.
Now, we could test early and often, and catch visual bugs soon after they were introduced. It enabled me to have conversations with teammates like:
“Hey, that most recent commit seems to have caused the submit button to shift downward. Was that intentional?”
Fixes could be made while the related code was fresh in people’s minds. No more waiting until the end of the project to test and hold our breaths. We could build confidence along the way.
Finding “Right” and Staying There
At the beginning of this article I asked how we can actually know that a web app’s visual appearance is “right”. Well, Applitools provides some great tools for that, whether you are using the Ultrafast Grid or the classic runner. Both send their snapshots to the web dashboard.
In the web dashboard, your snapshots can be reviewed and either approved or rejected. If you approve a snapshot, then it becomes the new baseline that all future snapshots are compared to. But an important first step is to establish an approved set of baselines at the beginning. Applitools is a great tool for detecting differences, but it cannot magically know whether or not your app matches your visual designs. That’s something that you have to establish at the beginning by careful examination. Once you have established those baselines, they are treated as the expected appearance of your app. They are your definition of “right”. This enables Applitools to detect differences going forward.
Here is a process to consider:
- The first time you run your tests Applitools will save the snapshots as the approved baselines.
- At this point, you should examine the snapshots and evaluate whether or not they look correct. If they don’t, then fix the issues and re-run the tests.
- As your app is developed, re-execute your tests often to evaluate whether your app still looks “right”.
- If changes are detected, you can either:
- Accept them, which will save them as a new baseline, or
- Reject them, and add comments to describe what is wrong.
- The approved baseline will progressively move forward as you accept expected changes throughout the course of the project, keeping a solid definition of “right” all along the way.
- When you are about to release, you can run your tests to see that the app still matches the baseline. This will give you confidence that the app will look correct when deployed.
Applitools Eyes
The baseline and change detection features I describe above are part of Applitools Eyes, a “Visual AI Analysis” tool that is part of both the Ultrafast Grid and the classic runner. So, even if you don’t want to spring for the fancy Ultrafast Grid, simply using the classic runner will give you access to these powerful analysis tools. They are a huge improvement over using a manual test script.
Further Reading
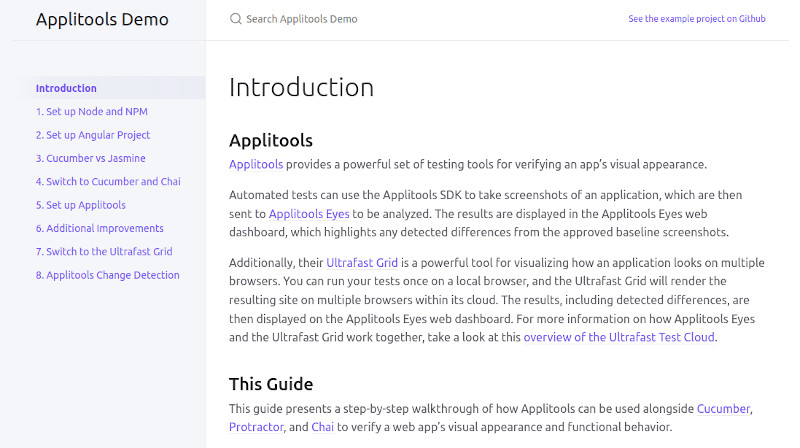
Overall, my experience with Applitools has been a great one. It has made a big impact on my testing outlook, and I look forward to using it in the future. If you’d like to read more about my experience using Applitools, check out this case study.
I feel like Applitools is such a compelling tool that I have written up a step by step walk-through of how to use it with Cucumber, Protractor, and Chai to test the visual appearance of Angular apps. I have also created a related GitHub repo to demonstrate how those tools can be used together. I hope that you find these resources to be helpful.
Happy testing!