Set up Applitools
Table of contents
Overview
You can follow the steps below to set up an Applitools test suite. See this commit in the example repository for the resulting changes. You might also find this documentation helpful.
Note: You will need an Applitools account to run the tests. The tests will upload screenshots to your account on the Applitools Eyes web dashboard for easy viewing and approving.
Install Applitools
Run this command from the project folder to install the @applitools/eyes-protractor NPM package.
npm install --save-dev @applitools/eyes-protractor
Write the Applitools Tests
As explained in the introduction, we are going to set up two test suites: one for the standard E2E tests, and one for the visual (Applitools) E2E tests. We already have the standard test suite in place. We’ll add the visual tests to a new folder to keep them separate: e2e/visual-tests/
We are going to use Cucumber to execute our Applitools tests, so let’s add a feature file and a steps file, organized under that directory:
e2e/visual-tests/
  features/visual-tests.feature
  steps/visual-tests.steps.ts
You can name these files however you’d like. I don’t plan on having more than one feature or steps file, so I am naming them generically. For applications with multiple pages or features, consider adding separate feature and steps files for each.
Also, we don’t need to add a page-objects folder because we will borrow the page objects file(s) from the standard test suite.
Feature File
Add this to the e2e/visual-tests/features/visual-tests.feature file:
Feature: Visual Testing (using Applitools)

  Scenario: Should have the expected design for the welcome page
    Given I am on the welcome page
    When I do nothing
    Then The design for the welcome page should be correct
As you can see, this has a lot in common with the welcome-page.feature file from the standard E2E test suite. The Given and When steps are reused. A new step is added to take the screenshot of the page: Then The design for the welcome page should be correct
You might find it valuable to verify that you are on the correct page, prior to taking a screenshot. Such a “pre-screenshot check” would prevent the test from taking a screenshot of an error page or empty page. To do so, you can borrow the Then from the standard test suite:
...
Given I am on the welcome page
When I do nothing
Then The welcome message should be shown
  And The design for the welcome page should be correct
Let’s now define that new step in the steps file
Steps File
A lot of the code for the steps file is demonstrated in Applitools’ Protractor Tutorial. First add the following imports to the e2e/visual-tests/steps/visual-tests.steps.ts file:
import { BatchInfo, ClassicRunner, Configuration, Eyes, RectangleSize, Target } from '@applitools/eyes-protractor'
import { After, BeforeAll, setDefaultTimeout, Then } from '@cucumber/cucumber';
import { browser } from 'protractor';
Cucumber’s default timeout is 5000 ms. This isn’t long enough to avoid timing out during testing, at least on my computer. So, add this line after the imports to change your default timeout. You might be able to get away with using a shorter timeout.
setDefaultTimeout(Number(30000));
Next, define the BeforeAll function:
let runner: ClassicRunner;
let eyes: Eyes;

BeforeAll(() => {
    runner = new ClassicRunner();
    eyes = new Eyes(runner);
    const configuration = new Configuration();
    configuration.setApiKey(process.env.APPLITOOLS_API_KEY);
    configuration.setBatch(new BatchInfo('Applitools Demo'));
    eyes.setConfiguration(configuration);
});
In the BeforeAll, we create a ClassicRunner, and use that to create an Eyes object. The classic runner is used to take screenshots of how your application looks on your local browser. It uses Applitools Eyes for analysis, without using the Ultrafast Grid.
The above function expects that you have an APPLITOOLS_API_KEY environment variable defined to store your API key. You can get your API key from your Applitools user account. Due to it being a secret key, it is best to NOT hard-code your API key in this file. Using an environment variable will help you avoid committing your API key to your repository’s history. This is especially important for shared repositories.
We set the batch name to “Applitools Demo”. The test results will show up in the Applitools Eyes web dashboard under that batch name.
Side Note: An alternative to the ClassicRunner is the VisualGridRunner, which uses Applitools’ Ultrafast Grid / Test Cloud to render and screenshot an app on multiple cloud-hosted browsers. It’s a powerful tool for testing on multiple browsers at once. We will cover it in a later article.
Next, add a Then function that defines the step that we referenced in the feature file:
Then('The design for the welcome page should be correct', async () => {
    // Start the test
    await eyes.open(browser, 'Applitools Demo', 'Angular Welcome Page', new RectangleSize(1024, 768));

    // Take a visual checkpoint (screenshot) of the page
    await eyes.check("Angular Welcome Page", Target.window().fully());

    // End the test.
    await eyes.close();
});
Above, we call eyes.open to start the test. It is called with:
- A reference to the browser:
browser - The name of the application under test:
'Applitools Demo' - The name of the test:
'Angular Welcome Page' - The viewport size:
new RectangleSize(1024, 768)
Note: The names can be configured to whatever makes sense to you. They aren’t references. They simply specify how you want the test results to be labeled in the Applitools Eyes web dashboard.
We call eyes.check to take a screenshot. You can take multiple screenshots during a test. It is called with:
- The screenshot name:
"Angular Welcome Page" - The target to capture:
Target.window().fully()// This captures a full-page screenshot.
We end the test with eyes.close()
Finally, add some cleanup code that ensure that eyes.close is called at the end:
After(async () => {
    if(eyes) {
        // If the test was aborted before eyes.close was called, ends the test as aborted.
        await eyes.abortAsync();
    }
});
Configure Protractor to Execute the Visual Tests
Protractor is currently configured to run the standard E2E test suite. We need to configure Protractor to also run the visual (Applitools) tests. We’ll have two separate NPM scripts, one for each test suite.
Add this script to package.json:
"e2e-visual-tests": "ng e2e --protractorConfig=e2e/protractor-visual-tests.conf.js"
Now, let’s add the e2e/protractor-visual-tests.conf.js file that we just referenced. It will live alongside the protractor.conf.js file.
// @ts-check
// Protractor configuration file, see link for more information
// https://github.com/angular/protractor/blob/master/lib/config.ts

/**
 * @type { import("protractor").Config }
 */
 exports.config = {
  allScriptsTimeout: 11000,
  specs: [
    './visual-tests/features/**/*.feature'
  ],
  capabilities: {
    browserName: 'chrome',
    chromeOptions: {
      args: [
        'remote-debugging-port=9222'
      ]
    },
  },
  directConnect: true,
  SELENIUM_PROMISE_MANAGER: false,
  baseUrl: 'http://localhost:4200/',
  framework: 'custom',
  frameworkPath: require.resolve('protractor-cucumber-framework'),
  cucumberOpts: {
    // strict: true,
    require: ['./visual-tests/steps/**/*.steps.ts', './steps/**/*.steps.ts'],
    tags: ''
  },
  onPrepare() {
    require('ts-node').register({
      project: require('path').join(__dirname, './tsconfig.json')
    });
  }
};
Most of this file is be the same as the e2e/protractor.conf.js file we already created, but with two important differences.
These lines tell Protractor where to find the feature files:
specs: [
  './visual-tests/features/**/*.feature'
],
This line tells Protractor where to find the steps files. Notice that we point to both sets of steps files, so that the visual tests can reuse the steps from the standard E2E tests suite.
require: ['./visual-tests/steps/**/*.steps.ts', './steps/**/*.steps.ts'],
Run the Tests
First, make sure that you have set up an APPLITOOLS_API_KEY environment variable with your personal API key.
Then, use this command to run the tests:
npm run e2e-visual-tests
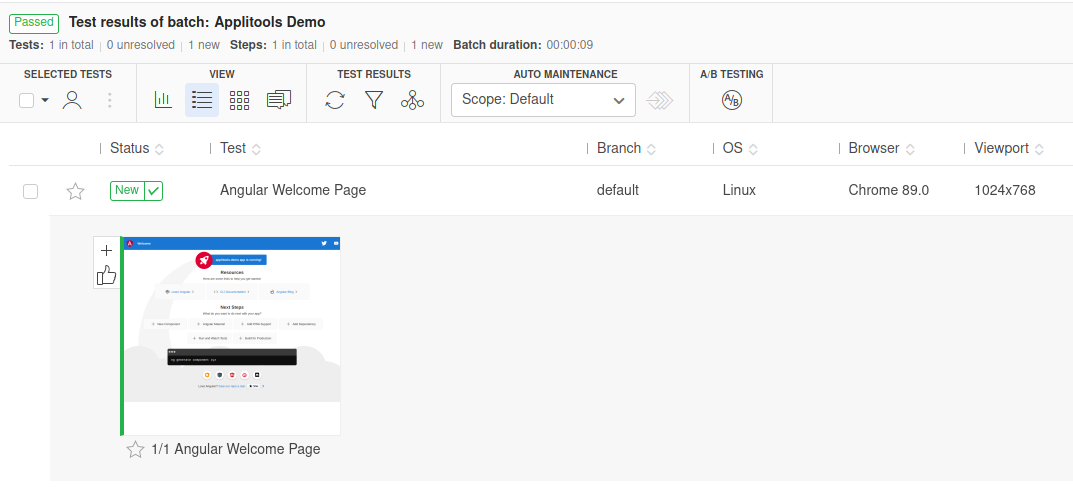
The tests should pass. Log into the Applitools Eyes web dashboard and you should see an “Applitools Demo” batch with a single screenshot.
Note: If the test fails prior to taking the screenshot, then no batch will show up in the Applitools Eyes web dashboard.